BDD best practices for writing test scenarios
Introduction
This document outlines Behavior-Driven Development best practices to follow when writing test scenarios
Behavior-Driven Development (BDD)
BDD test scenarios play a crucial role when creating and maintaining the test suite in Adam Matthew Digital. The BDD scenarios are written in the Gherkin format which is a DSL (Domain Specific Language) that allows you to describe the application's behavior in a human-readable format, and also allows these scenarios to be reused later in multiple test suites.
What is Cucumber and why do we use it?
Cucumber is a testing tool that supports Behavior Driven Development (BDD), we have incorporated it into our regression suite. It offers a way to write tests that anybody can understand, regardless of their technical knowledge, doing so utilizing a syntax called called Gherkin

What is Gherkin?
Gherkin is a very simple language that uses a set of keywords to define the structure and behavior of our tests. It is easily readable by both non-technical and technical members of the team. It features a set of grammar rules that makes plain text structured enough for Cucumber to understand it.
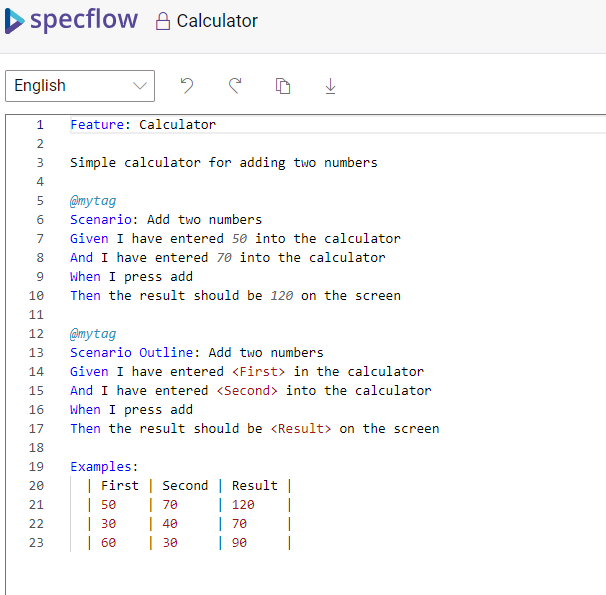
The scenario below is written in Gherkin:

Gherkin serves multiple purposes:
- Unambiguous executable specification
- Automated testing using Cucumber
- Document how the system actually behaves
Understanding Gherkin syntax And Creating feature files
These are the primary components of Gherkin syntax:
• Feature: A high-level description of a software feature or functionality being tested. It is always located on the top of the feature file.
• Scenario: A specific use case of the feature that is being tested.
• Given: Describes the initial state or preconditions of the system before the scenario.
• When: Describes the action or event that triggers the scenario.
• Then: Describes the expected outcome or postconditions of the system after the scenario.
• And: Successive step
The BDD test scenarios reside in the appropriate feature files, that reside in a special folder called ‘features’, and have the ‘.feature’ file extension associated with them.
Here is an example of a feature file for the Home Page:

Gherkin Best practice - using the specflow editor
Using the Specflow Gherkin editor is recommended.
It is a tool that allows you to write, download and share Gherkin Feature Files. The text can also copied and pasted out straight into DevOps or Visual Studio Code as required.
The editor is bundled with a number of handy features to enable teams to collaborate more efficiently and write better Gherkin. The Gherkin Editor is constantly improving with additional features added based on what our user community requests.
In a similar fashion to the way in which Visual studio code works, there is an intelligent editor with intellisense , Specflow allows:
-
Highlighting of Gherkin keywords
-
Automatic table formatting
-
Variable highlighting
-
Validating of your feature file
Note: The editor has a 15,000 character limit and you can store a maximum of 25 feature files.
Writing meaningful Feature descriptions
The feature file starts with the feature description. The purpose of the Feature keyword is to provide a clear understanding of the software feature that is being tested, and to group related scenarios.
The first primary keyword in a Gherkin document must always be Feature, followed by a : and a short text that describes the feature.
These description lines are ignored by Cucumber at runtime, but are available for reporting.
• Be concise and descriptive, focusing on the functionality being tested. • Avoid technical jargon and write in a language that both technical and non-technical stakeholders can understand.
Here is an example below from our regression suite:

Defining clear and concise Scenarios
Each Scenario represents a single, specific example of the feature's behavior. Please follow these guidelines when writing the scenarios:
• Use simple language that is easy to understand for both technical and non-technical stakeholders.
• Focus on one specific aspect or use case of the feature being tested.
• Ensure that the Scenario can be executed independently and does not rely on the state of other Scenarios.
• It is preferred to start a GIVEN statement on the page the test is being executed. This avoids unnecessary steps to navigate from elsewhere to the tested page, keeping our tests more concise and readable. An example can be seen on the screenshot below,

• Under each scenario, only one GIVEN statement should exist. This again makes the feature files more readable.
• It is also important to note that for some scenarios a WHEN statement is not needed. For example, if the test is to navigate to a page and checking if a list of elements were present, this wouldn't need a WHEN statement. This example can be seen in practice in the screenshot below.

• Finally, as a best practice we are currently experimenting on using just one WHEN and THEN statement for each scenario. This means that we will be using AND statements if there are successive steps under each of these WHEN and THEN statements. This also means that we will avoid having a WHEN after a THEN. This will make the tests more readable as it will be clear from the feature file, which steps are the initial state, the actions and the expected outcome. This is an experiment for the time being. This approach will be continually be monitored as the solutions get larger. An example can be seen in the screenshot below.

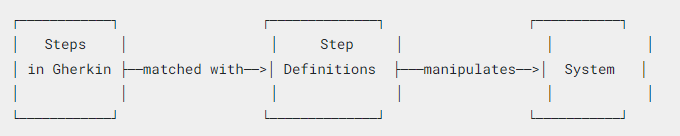
Turning Feature files into reusable and modular Step Definitions
Step definitions connect Gherkin steps to programming code. A step definition carries out the action that should be performed by the step. So step definitions hard-wire the specification to the implementation.
Step definitions can be written in many programming languages. Here is an example using JavaScript:

Here is an example below from our regression suite:

One of the greatest benefits of using BDD is the reusable scenarios or to be more precise the reusable step definitions, and this is important to understand to fully grasp the significance of the BDD approach.
Let’s start off with explaining the approach.
As we have already seen, Given, When, Then, And represent test steps in each scenario.
Each of these steps has a description or a step definition, for an example:
Given the user is on the staging site
In this case a step definition would be ‘a user is on the staging site’.
Behind this step definition there is code that is executed. This code is in the step definition file, which resides in the ‘step-definition’ folder. The grouping of these step definitions in the AMD case are based on the functionality’s location. In the hypothetical example above that would be something like the step-definition file “LoginPageDefinitions.ts”
This step definition in the feature file can be reused elsewhere as well, in other scenarios.
For an example:
Scenario: Successful login from the staging site
Given a user is on the staging site
When the user navigates to the AMD login page
And the user enters valid username and password
And clicks on the Login button
Then the user should be redirected to the dashboard
As you can see in this hypothetical scenario, the ‘the user navigates to the AMD login page’ was moved to the When step.
That said, this just shows the infinite capabilities of these tests and how different scenarios can be made by combining these test steps.
To create reusable and modular Step Definitions, follow these best practices:
• Write Step Definitions that are concise, focused, and implement only the necessary actions for the given step.
In the example above, a clear distinction was made: ‘clicks on the staging site Login button’ ‘clicks on the Login button’
This is because, the selectors or the actions taken, for the login button, might be different on the staging site.
• Use expressive and clear language in your Step Definitions to ensure they are easy to understand and maintain.
By following these best practices, you can create BDD test scenarios that are easy to read, understand, and maintain, allowing both technical and non-technical stakeholders to collaborate effectively on the testing process.
Creating and Organizing Step Definition Files
As we said earlier, the Step definition files contain the code that connects the Gherkin steps in your feature files to the actual implementation of the test. These files are crucial for maintaining the readability and modularity of your BDD test suite. Here are some best practices for creating and organizing step definition files:
-
Naming convention: Use a consistent naming convention for your step definition files. A common approach is to name them based on the feature or page they are associated with, followed by the word "Definitions" (e.g., DocumentsListDefinitions.ts, ListPageDefinitions.ts).
-
Folder structure: Store step definition files in a dedicated folder, typically named step-definitions. This keeps your test code organized and makes it easier to locate step definitions.
-
One-to-one mapping: Create a one-to-one mapping between feature files and their corresponding step definition files. This approach simplifies the process of locating the code related to specific scenarios. (Example: If you have a loginPage.ts create a LoginPageDefinitions.ts step-definition file).
-
Modularity: Write modular step definitions by breaking down complex actions into smaller, reusable functions. This practice promotes maintainability and enables you to reuse code across multiple steps and scenarios.
-
Parameterization: Use parameters in your step definitions to make them more flexible and reusable. This allows you to write more concise and expressive test scenarios. In the example below, “QA”, “QA members” and “
” are the parameters that can be changed.
Here is an example hypothetical step definition to fully understand the explanation above
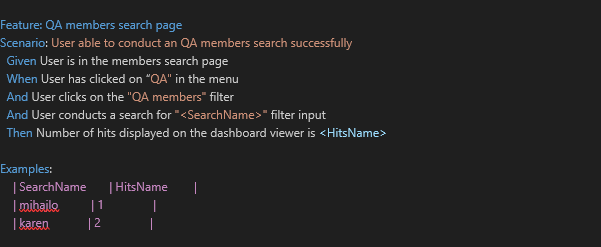
Let’s take the ‘User conducts a search for "
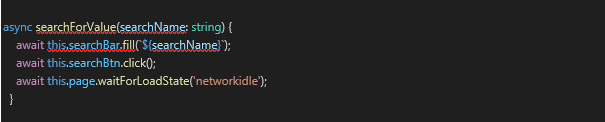
This is how the code looks like in the step-definition file. Please notice the parametrization “{string}” for "

As you can see we have a searchForValue method in the step-definition file.
This method resides in the membersDetailsPage.ts, which is located in the ‘pages’ folder.
Page files
A "page file" in the context of automated testing and the Page Object Model (POM) is a file that represents a specific page or a part of a web application. The page file contains a class or an object that encapsulates the selectors and actions specific to that page. This abstraction allows you to interact with the web application in a more maintainable, reusable, and readable way within your test suite.
As we saw with the example above, that is where we write the actions or methods that interact with the web elements.
Firstly, we create a class and name this accordingly. For example; AdvancedSearchPage

Secondly, we create readonly locators for the objects that appear on the Advanced Search Page:

Then we create a constructor to house all of those objects. Constructors essentially allow the creation of objects from classes.
Here are samples of methods that might reside in the pages file:

this.LoginButton is the selector for the login button, that also resides in the Page file.